|
||
 |
| Home |
| Who Is Stone Marmot? |
| Hear Our Music |
| Read Our Lyrics |
| Buy Our Music and Merchandise |
| News |
| Rants and Raves |
| Contact Us |
|
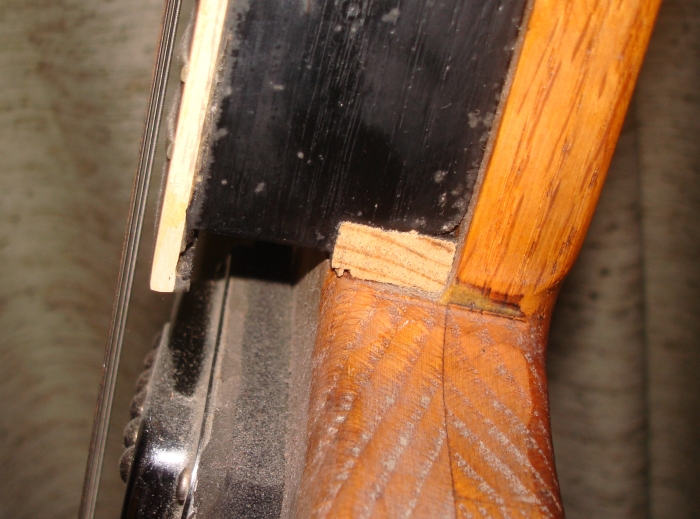
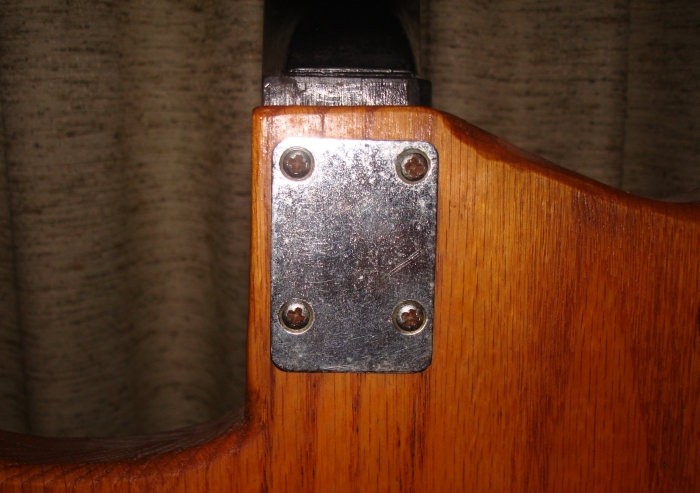
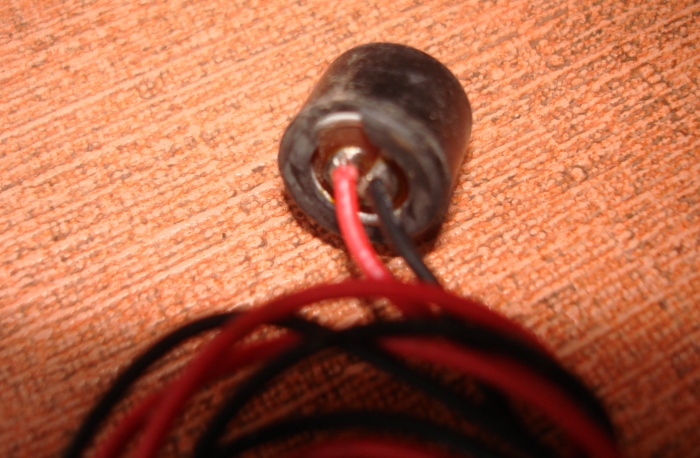
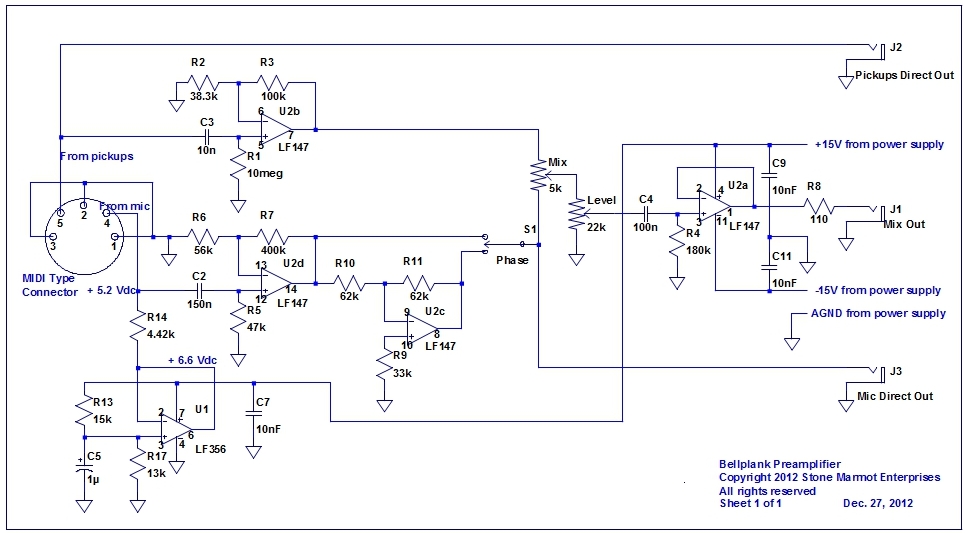
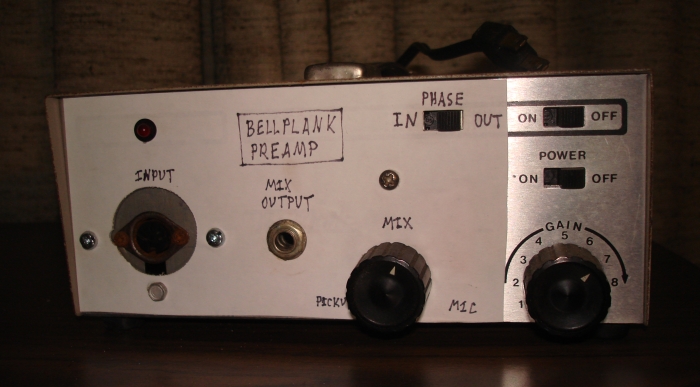
Bellplank Electric Guitar, Revisited By Sid of Stone Marmot Sept. 28, 2014 In 2007, I built an electric guitar around a ten inch diameter bronze plate that was an award a past employer gave me where they misspelled my name. I refer to this guitar as the Bellplank. The result is shown in Figure 1. The details on its construction may be found in this article. After using the guitar for a while, I had three concerns. One is that the bridge was adjusted about as far back towards the tailpiece as it could go to get the intonation right, leaving no room for future adjustments in one direction. Another is that very little plate vibration was getting into the pickups so it didn't sound too much different than any other electric guitar. The last is that a lot of the vibration of the portion of the strings between the bridge and tailpiece was being amplified. This article addresses my efforts to correct these concerns. I felt the easiest way to center the bridge within its adjustment range when the intonation was right would be to move the neck a quarter of an inch from the tailpiece by drilling new mounting holes in the body. That would leave a space between the end of the neck and the body, which I filled with a piece of scrap hardwood. Figure 2 shows that piece of hardwood filling that quarter inch space between the neck and the body. Note that the wood filling this space hasn't been painted yet and is still its original blond color. I filled in the original neck mounting screw holes with wood and glue. Note in Figure 3 that the holes in the metal plate that spreads the stress from the neck mounting screws is not centered so that the plate covers the old screw holes. Note some of the flat portion at the base of the neck where it joins the body now overhangs the body after shifting the neck a quarter of an inch. Another concern is that little of the plate vibration was getting into the pickups. I thought about installing a piezoelectric transducer to the plate. But I decided to use a small microphone inside the body against the plate. I tried a number of different mics and the tiny, cheap condenser mics worked best. These are the type of mics usually found inside tape recorders and computers. They are also known as electret microphones. Figure 4 shows one salvaged from an old tape recorder on the right with a Radio Shack equivalent on the left. I used one salvaged from an old tape recorder because it had a rubber jacket around it to reduce coupling of vibrations through the mic body. I wanted the mic to mostly pick up the sound from the plate and not other extraneous vibrations. If you want to do something similar but don't have a tape recorder or computer you want to salvage a mic from, you could use a Radio Shack or similar mic instead. Figure 5 shows the back of the Radio Shack package. This gives you an idea of the mic specs and how to apply it. This is an old mic and I'm not sure they still sell this same exact package but I'm sure they still sell an equivalent. I know Digikey does. Figures 6 is a closeup of the back of the tape recorder mic. It shows that it still has two connections on the back, with the red being the positive lead and the black the return. Note that some of these microphones have three connections, a separate one being provided for power. I moved the mic around on the top of the plate while the guitar was assembled until I found a spot where the sound through the mic was best. This place turned out to be between the A and G strings about a half inch behind the bridge between the bridge and tailpiece. I then disassembled the guitar and mounted the mic at that spot under the plate inside the body with a metal bracket attached to a bridge mounting screw. My hope was the sound inside the body was the same at the same point on the plate as outside the body, which turned out to be pretty much true. The mic face was against the plate, though separated from the plate by the rubber jacket around the body of the mic. Unfortunately, I forgot to take pictures of the mounting of the mic and don't feel like disassembling the guitar to do so. One thing I don't like about condenser mics (and piezo pickups as well) is that they require a power supply. The output impedance and signal level of the mic (and piezo pickups as well) is much different than that of typical electromagnetic guitar pickups. This would require an active preamp and mixer to combine these two different types of signal sources, the mic and guitar pickups. I didn't want to have batteries in the guitar. So I decided to send the mic signal and the electric guitar pickup signal separately from the guitar through the same cable and combine them in an external preamp/mixer with its own AC power supply. Figure 7 shows a schematic of the modified Bellplank wiring. A standard MIDI cable and connectors have necessary pins, wires, and shields to do this. So that is what I used, a MIDI style connector on the guitar and on the external preamp/mixer with a standard MIDI cable between them. I needed someplace on the guitar to add the MIDI connector. I virtually never use the tone controls on my guitars, so I decided to mount the connector in place of the tone control. Figure 8 shows the standard five pin MIDI connector in place of the tone control. Note that the quarter inch phone jack still has the output of the electromagnetic guitar pickups so I can still use it like a standard electric guitar without the mic and preamp. Note that though this is a MIDI style connector, it is not a MIDI interface and won't work plugged into a standard MIDI interface. Figure 9 shows the schematic for the preamp and mixer. U1, the LF356, provides the bias power through R14 (4.42k) to the condenser mic. U2b buffers the elctromagnetic guitar pickup signal while U2d buffers and amplifies the mic signal. U2c inverts the mic signal so that I can select the mic in or out of phase with the pickup signal. There are separate outputs for the pickups and the mic, as well as the mixed output, so that I can record the sound sources on separate channels and process them differently. I built this out of an existing scrap electronics board and parts I had laying around the house. Consequently, the values may not be optimum, though in many cases the values aren't that critical. For example, 1 Meg minimum is good enough for R1. I used 10 Meg simply because that was what was already on the board I was modifying. Also, I would have typically chosen values about a factor of ten smaller for R9, R10, and R11, but that's what was already on the existing board. R7 is also really two 200k resistors in series. I don't show the schematic for the +/- 15 Vdc supply, since I built it from some unusual parts that I had laying around but would otherwise be hard to find these days. Anything between +/- 8 Vdc to +/- 16 Vdc should work. You could use two 9 V batteries, though I hate batteries (they always leak). Figures 10 shows the box I installed the preamp in. It was salvaged from some old piece of test equipment. Consequently, the switch on the top right of the panel is not used and was just part of the original equipment that was in the box. The direct outputs are on the back. The last concern is that a lot of the vibration of the portion of the strings between the bridge and tailpiece was being amplified. This is common to many hollow body guitars where the bridge is more than a few inches from the tailpiece. Since the distance between the bridge and tailpiece isn't tuned for each string, the sound from the vibration of this portion of the strings is out of tune with respect to what is being played. This usually isn't a big problem and actually contributes to the characteristic sound of hollow body guitars. But in the Bellplank, the microphone that is picking up the plate vibrations is also picking up a much higher amount of the vibration of the portion of the strings between the bridge and tailpiece than for a typical hollow body guitar, enough to be distracting at times. I haven't come up with an easy way to switch a string dampener in and out of place when needed. Right now, I'm just using a piece of cloth, like a cotton sock, or a piece of foam jammed between the plate and the strings in this area between the bridge and tailpiece as needed. Figure 11 shows a piece of black foam just behind the bridge in this area.
So, how does it sound now? It does have a more unique sound now, kind of a cross between an electric guitar and a dobro. This guitar is the bright guitar heard in the intro and that continues playing throughout our song "But I'm Happy." The sound in this song was adjusted for about half Rickenbacker pickups and half microphone. I am using some foam to mostly dampen the vibration of the portion of the strings between the bridge and tailpiece. © 2014 Stone Marmot Enterprises, all rights reserved. |
||
 Figure 1 - Finished Bellplank guitar